We have spent my summer "vacation" (six weeks of tutoring and eight weeks of three grad school classes hardly left me with tons of free time) fixing up our house to get ready to sell it soon. D and I got the urge to rip the carpet off the stairs this weekend and have been working on the stairs ever since. This is after about 3 days of work... I can't wait to see the final project! Anyway, I went into my room yesterday and can't wait to show you my room at the end of the week! I've also been busy working on some projects here at home to get ready for pre-planning next week.
I put the finishing touches on my Meet the Teacher goldfish and books. I just made my labels in word, and they aren't anything fancy. I normally put a border or clipart on labels for things like this, but I had a lot to say and I wanted the font to be big. I used purple for girls and blue for boys.
I also got started on a BRAND NEW project today. In the spring, I completed some leadership trainings. Most of them were basic, survey type sessions, but during the behavior session I learned about the CHAMPS behavior strategy. The letters stand for conversation, help, activity, movement, participation, success. It's a behavior management strategy based around setting very clear expectations for students, and I'm really excited to give it a try. You can read more about it here. I know the hot trend is tossing out your clipchart, but I'm not ready to do that just yet! I'm planning on incorporating CHAMPS along with my clipchart for now, and hopefully ditching the chart one day.
I'm putting together a board that is kinder-friendly. This means lots of colors and lots of pictures! I completed my board today, and I'm going to print/laminate some photographs and clipart for the help, activity, participation, and movement parts. For the conversation portion, I'm planning on printing out these visuals that are FREE on TPT. There are tons and tons of "voice level charts" on TPT and many are free! I like these and these too.
To make my chart, I started with a bright blue poster board I got at the grocery store. After making my letters, one poster board was not enough so I ended up taping a second one on too. I'm going to laminate the whole thing at the end, so the seam really won't be noticeable.
Don't you just love my home office? I actually have a big desk and work area in my guest room, but the guest room has become renovation/paint central. Now that we're done painting all the doors in our house, I'm excited to have my beautiful guest room back! Stay tuned, haha.
Next, I flipped the poster board over and put tape on my letters. Normally, I would've used a gluestick, but I didn't have one at my house today for some reason. I figured tape would be fine so I could adjust the letters if needed, and I'm going to laminate the whole thing anyway.
I just eyeballed it. Nothing perfectly perfect over here. ;)
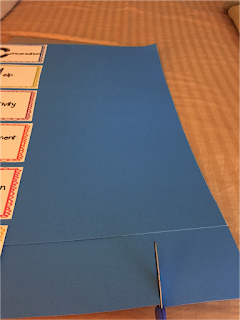
After I had taped all the letters down, I cut off the extra poster board. I didn't want it to be too long or too wide so that it would take up a ton of space on my whiteboard at school.
I'm sure you could find some of these letters made on TPT, but I just made mine myself. I used these free fuzzy bump borders and some Hello fonts. If you emailed me, I'd be happy to send you these letters for free!
Let me know if you try this strategy as well!! What have you been working on for your classroom this summer? I'd love to know!


0 comments:
Post a Comment